Linux Networking with Connect2SSH

Connect2SSH

Connect2SSH is a BASH based script that allows for easier and quicker management of SSH and SSHFS sessions to unlimited hosts.

Jeremy O’Connell at CyperWeb Solutions is like many system administrators out there. He rides heard on a lot of servers, Including the EzeeLinux web server. Jeremy transitioned his entire operation over to Ubuntu MATE a while back and I was consulting with him as he geared up to make the big move. One of the things that came out of it was a new tool Jeremy wrote called Connect2SSH. I am not a programmer but I was happy to offer ideas and be his guinea pig. Connect2SSH helps you to create a database of servers and accounts and automates much of the nuts and bolts of using SSH to administer servers and local machines thereafter.. If you are one who works with lots of servers or a large corporate network or both, Connect2SSH is something you need to look at.

Lots of folks come to me for advice about networking their Linux boxes and so I proposed that Jeremy and I should take an in-depth look at Linux Networking and introduce Connect2SSH to the world as well. That all came together in a mammoth YouTube video in which we broke it all down. It’s nearly 3 hours long! Now, don’t freak out. There are timestamps in the description that divide things up in such a way that you can watch them one at a time or roll back to refer to something you might have missed. You’ll find links to the Connect2SSH page and the class notes too. It is probably the most detailed current video about SSH and all its varied applications. Grab some popcorn and prepare to be amazed.

You say you have just a few Linux machine? No problem, SSH is for everyone!

If you do a search for “Linux Networking,” Mr. Google will most likely return a lot of info about Samba and NFS. NFS is rather simple but Samba can be a huge pain to get setup and working they way you want it to. Both can be frustrating to work with but there is an alternative which is super scalable, secure, and works on local networks and will even connect up machines across the Internet: SSH.

The secure shell (SSH) and its suite of utilities offer extremely powerful options for moving data from one machine to another. The funny thing about SSH is that many Linux users are unaware of just how much you can do with SSH and how easy it is to setup. Most Linux distros come with most of the tools you need already installed. Every Linux out there already has the SSH client ready to go. You just need to install or activate the SSH server to share your machine with the world. You can move files across the Internet or your local network with tools like scp, rsync and even browse for files on other machines with sftp and sshfs. You can also use your favorite file manager to work with a remote machine’s’ files. There’s more: X forwarding will let you run apps on remote machines that need a GUI interface and you can see them on your local machine. No, I’m not talking about sharing an entire desktop, even though you can do that too if you want to. I’m talking about just one app. Cool, huh?

One of the reasons Jeremy and I wanted to get so detailed about SSH was because we couldn’t find a whole lot of documentation out there that went into the file sharing abilities that go along with it. I’ve been using SSH to share data from machine to machine and administer my home network for quite some time now. I have found it to be a much simpler solution compared to Samba or NFS and we thought it was time that someone put a spotlight on SSH. Connect2SSH just adds to the list of tools that are already on your Linux machine that works with SSH.

Both Jeremy and I would love to hear your feedback!

More Networking Tricks

network-tricks

I consider the residential gateway overloaded. Your ISP is in the business of selling you the cheapest possible computer component to be a gateway device. Current devices also include a WiFi radio to double as home access point. By setting up a Raspberry Pi as your DHCP server and DNS forwarder, you can remove that burden from the residential gateway and just let it pass packets.

Separate WiFi?

Your standard residential gateway might have a 802.11 a/b/g/n 1×1 radio; maybe a 2×2 radio. This doesn’t obviously cripple your residential gateway, but the radio reception might be poor, and it probably won’t cover your whole house. You will likely get much better reception by getting one or more inexpensive 802.11 a/b/g/n 3×3 MIMO radio access points. The three antennas (when pointed in different directions) are much more effective.

Even more effective WiFi coverage comes from putting multiple APs in common areas at medium power to spread the coverage out. There are a lot of WiFi planning applications you can use to get to help you. One of the basic techniques is a “hex cell” design, and the idea is that you can choose three channels that are not near each other. Channel 1, Channel 6, Channel 11 are the common choices. As long as two adjacent hex cells are not on the same channel, you should have reasonable protection from channel interference. Using medium power means that people right next to an AP won’t suffer from over-driven signal strength, which also cripples performance.

More DHCP Tricks

There are a lot of things you can do with DHCP. And if you avidly tinker with your computers (and I encourage you to tinker), dnsmasq is a good way to explore what you can do with your DHCP server. Different network interfaces on your dhcp server can be granted different address pools. Specific MAC addresses can be given persistent IP addresses outside of an address pool. You can manage machine names from the /etc/hosts file of the dhcp server. At the same time, this approach allows computers to announce their own name. This allows you to connect to hamster1 by name on the network, where hamster1 is the name set locally on the machine. You can also publish multiple routes to networks outside of your LAN, such as your VPNed networks.

This might also be useful for separating your own “IoT” network. Most of the wee devices that want to connect to a WiFi controller typically join your default network. A shrewd network administrator will create a separate DHCP leases pool for MAC address patterns used by their devices and assign them a completely different network range that has no gateway address. Don’t use your APs to serve DHCP. Your AP doesn’t care how many different addresses it passes through it, so use your Raspberry Pi dnsmasq server to serve your DHCP addresses.

Controlling Ads

There is a wonderful project: hBlock, which is a curated list of adware/malware addresses. You can create a hosts file where all the ad server names can get mapped to 127.0.0.1 or 0.0.0.0.

In your /etc/dnsmasq.conf file, you would add an ‘addn-hosts’ directive to point to the hBlock output file. You have to edit the hBlock output file a bit, but it’s not difficult. I separate my own network hosts files up into three files:

  • Entries for 127/8 and localnet and own hostname:
    addn-hosts=/etc/hosts-localhost
  • Entries for my LAN hostnames:
    addn-hosts=/etc/hosts-bitratchet.net
  • Entries to block:
    addn-hosts=/etc/hosts-hblock

This keeps things pretty organized. It also protects all members of my home network from getting things from crapware sites.

Are Proxies Worth the Effort?

Back in 2010, before HTTPS Everywhere was not a Firefox plugin, a squid proxy was a great way to save on bandwidth. You can configure your DHCP server to announce a WPAD address and every browser on your network should have auto-configured itself to use your local http proxy. Now, with most popular sites using HTTPS, the value of a HTTP proxy is diminished as a form of acceleration…for those sites. You can create a certificate for your own proxy and install that certificate on your machine if you want to proxy https on your local network, but it won’t help guests. Also, in a public setting, these proxies can become a ripe target.

There are still many sites that are plain HTTP. Notably, Linux distribution repositories. All those .deb and .rpm files are mostly still available over plain HTTP, and caching them does your distribution a favor. If you regularly do updates, play with VM images of Linux, or have an office of linux machines, you might even consider installing IntelligentMirror on your squid server. You can edit your /etc/apt/apt.conf or /etc/dnf/dnf.conf files with proxy entries.

Access Control and Virus Scanning on Proxies

It is also possible to kick your kids off the internet at certain times of day using squid. This is possible by setting access control rules by IP where certain times of day are permissible to browse the Internet. Getting this working effectively might be difficult.

It is also possible to make squid use ClamAV to scan the files requested. I’ve not done this before, but there are how-to’s out there on how to do that. This would be a very effective complement to using hBlock.

Is DNS What Makes My Internet Slow?

dns

Recently, we saw what happened with the botnet attack on Dyn, but instead, let’s talk about a fine day on a happy Beatrix Potter-like Internet, shall we? We start on your local network: your DSL modem (or cable box) is your residential gateway. There’s a little hedgehog inside, helping the hamster in your computer fetch those silly cat photos from the Internet. The problem: your ISP ships you a pretty sad hedgehog inside that residential gateway.

So my modem makes the Internet slow?

When you turn on your home computer, the hamster inside gets a zap, and starts spinning the CPU wheel really fast, providing energy to your network interface. To get a network address, the hamster blows a horn on your network card, requesting an address. This is a DHCP request.

Hearing this DHCP Discovery announcement, the hedgehog in your residential gateway puts on its glasses, straightens his bow-tie, and consults the network address leases ledger. This ledger associates your hamster’s MAC address (like 00:04:3a:af:32:0a ) with an IP address (like 192.168.0.2) He writes the DHCP offer on a slip of oiled paper with india ink and quietly passes the note to the hamster. Inevitably, the ink smears off the note and the hamster will have to blast the horn again. But before the ink smears, the hamster has enough info to fetch a silly cat picture.

What does DHCP have to do with DNS?

Your Linux computer is running dhclient (DHCP client) to ask for an IP address, and your residential gateway is running dhcpd (DHCP daemon). When your computer gets a DHCP Offer, it contains the IP of your network gateway, the IPs of other network gateways, and the IP of a DNS server. This determines where you ask for DNS answers. An offer might contain:

Your Address:    192.168.0.10
Gateway:         192.168.0.1
Options {
    1 (Netmask): 255.255.255.0
    3 (Router):  192.168.0.1
    6 (DNS):     205.171.2.25
   51 (Lease time): 86400 seconds
}

And the DNS part?

So when your hamster asks for www.bing.com, it zaps a DNS query to 205.171.2.25. So how do we know that number? Our dhclient daemon rewrites /etc/resolv.conf with that DNS server ip.

 $ cat /etc/resolv.conf
# Dynamic resolv.conf(5) file for glibc resolver(3) generated by resolvconf(8)
#     DO NOT EDIT THIS FILE BY HAND -- YOUR CHANGES WILL BE OVERWRITTEN
nameserver 192.168.0.1
nameserver 205.171.2.25

If you ping 205.171.2.25, you’ll be lucky to get a time as good as 35 milliseconds (ms).

 $ ping 205.171.2.25
64 bytes from 205.171.2.25: icmp_seq=1 ttl=60 time=24.1 ms
64 bytes from 205.171.2.25: icmp_seq=2 ttl=60 time=279 ms
64 bytes from 205.171.2.25: icmp_seq=3 ttl=60 time=302 ms
64 bytes from 205.171.2.25: icmp_seq=4 ttl=60 time=325 ms
64 bytes from 205.171.2.25: icmp_seq=5 ttl=60 time=41.1 ms
^C

Compare Google’s DNS:

 $ ping 8.8.8.8
PING 8.8.8.8 (8.8.8.8) 56(84) bytes of data.
64 bytes from 8.8.8.8: icmp_seq=1 ttl=59 time=25.3 ms
64 bytes from 8.8.8.8: icmp_seq=2 ttl=59 time=129 ms
64 bytes from 8.8.8.8: icmp_seq=3 ttl=59 time=556 ms
64 bytes from 8.8.8.8: icmp_seq=4 ttl=59 time=176 ms
64 bytes from 8.8.8.8: icmp_seq=5 ttl=59 time=200 ms
^C

Compare my residential gateway:

 $ ping 192.168.0.1
64 bytes from 192.168.0.1: icmp_seq=1 ttl=64 time=6.12 ms
64 bytes from 192.168.0.1: icmp_seq=2 ttl=64 time=5.46 ms
64 bytes from 192.168.0.1: icmp_seq=3 ttl=64 time=5.32 ms
^C

Compare two hosts on a gigabit Ethernet switch:

 $ ping 192.168.100.1
64 bytes from 192.168.100.24: icmp_seq=1 ttl=64 time=0.238 ms
64 bytes from 192.168.100.24: icmp_seq=2 ttl=64 time=0.269 ms
64 bytes from 192.168.100.24: icmp_seq=3 ttl=64 time=0.188 ms

(Looks like the modem I’m at, or the ISP I’m using, probably enforces a rate limit on ICMP. Looks like the first response was at full speed. The further responses were significantly delayed.)

Gone are the days where network times were measured in only milliseconds. A typical time to ping your network gateway on an Ethernet network is about 250 microseconds. So if205.171.2.25 returns an answer immediately, it takes 300.25 ms.

If you try that on a wireless, a ping to your gateway is more likely going to be 6ms, and a DNS result will be 306.25ms. Now repeat that for ten host names referenced in a web page, then you might spend as little as 3 seconds just asking for IPs to start making connections. What you have there is a rather dumb hedgehog.

You can use dig to query for DNS host name lookup times.

 $ dig www.bing.com @8.8.8.8 2>&1 | grep -i 'query time'
;; Query time: 249 msec
 $ dig www.bing.com @205.171.2.25 2>&1 | grep -i 'query time'
;; Query time: 208 msec

Looks like Google and CenturyLink are not so far off, mostly transit time. Let’s compare against our residential gateway:

 $ dig www.bing.com @192.168.0.1 2>&1 | grep -i 'query time'
;; Query time: 26 msec
 $ dig www.bing.com @192.168.0.1 2>&1 | grep -i 'query time'
;; Query time: 152 msec
 $ dig www.bing.com @192.168.0.1 2>&1 | grep -i 'query time'
;; Query time: 25 msec

Wow, was that inconsistent or what? Now, let’s not be too hasty…that was conducted over a WiFi network. Anytime you do that you can get a series of radio retransmissions…but still. Now I’ll compare it to an Intel Atom powered firewall running dnsmasq:

 $ dig www.bing.com @192.168.100.1 2>&1 | grep -i 'query time'
;; Query time: 20 msec
 $ dig www.bing.com @192.168.100.1 2>&1 | grep -i 'query time'
;; Query time: 0 msec

OH SNAP as my local hedgehogs say, a zero milliseconds query time! Actually, it’s a 236 microsecond response, because that’s our average ping time on that network. This is value of a caching forwarder! Compare the craptastic performance of my ISPs residential gateway: 25 ms is four times longer than a cached response that should look identical to our 6ms ping time.

Upgrading your Hedgehog

DNSmasq is both a DHCPD server and a caching DNS forwarder. It makes your hedgehog smarter. If you set up another computer on your network to serve DHCP and DNS, remember turn off DHCP on your residential gateway. If you get it right, you can get prompt speedup, but if you leave both running, you have dueling hedgehogs confusing your hamster until it passes out! Your computer will get conflicting responses from both DHCP servers and the faster hardware doesn’t always answer first.

Lets setup a Rasberry Pi with a fixed IP of 192.168.0.3 and configure dnsmasq on it. Your new dnsmasq DHCP offer would look like this:

Your Address:    192.168.0.10
Gateway:         192.168.0.1
Options {
    1 (Netmask): 255.255.255.0
    3 (Router):  192.168.0.1
    6 (DNS):     192.168.0.3
   51 (Lease time): 86400 seconds
}

Your Rasberry Pi will answer DNS queries by asking 205.171.2.25 if the answer isn’t cached. So the first DNS response is always going to be slowest. But if it takes a snappy hedgehog 1 microsecond to return the cached IP of www.bing.com, your web page with ten host names in it could take 0.21ms (210us) to start downloading.

This performance gain is one reason I prefer move my DNS service away off my residential gateway. I’ll discuss more on using dnsmasq and ideas on splitting up your network devices in further posts.

WiFi Without Network Manager Frippery

interfaces

Back in my day, sonny…there was a time when you could make your networking work without the network manager applet. Not that I’m saying the NetworkManager program is bad, because it actually has been getting better. But the fact of the matter is that I’m a networking guy and a server guy, so I need keep my config-file wits sharp. So take out your pocket knife and let’s start to whittle.

Begin by learning and making some notes about your interfaces before you start to turn off NetworkManager. You’ll need to write down these 3 things:

1) Your SSID and passphrase.
2) The names of your Ethernet and radio devices. They might look like wlan0, wifi0, eth0 or enp2p1.
3) Your gateway IP address.

Next, we’ll start to monkey around in the command line… I’ll do this with Ubuntu in mind.

So, let’s list our interfaces:

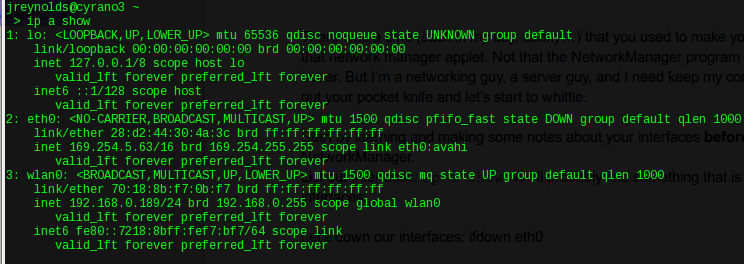
$ ip a show

Note the default Ethernet and wifi interfaces:
ip-a-show

It looks like our Ethernet port is eth0. Our WiFi radio is wlan0. Want to make this briefer?

$ ip a show | awk  '/^[0-9]: /{print $2}'

The output of this command will look something like this:

lo:
eth0:
wlan0:

Your gateway IP address is found with:

route -n

It provides access to destination 0.0.0.0 (everything). In the below image it is 192.168.0.1, which is perfectly nominal.

route-n
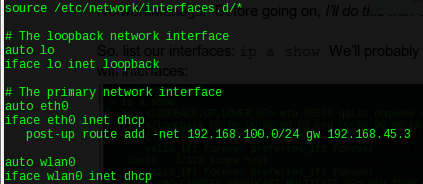
Let’s do a bit of easy configuration in our /etc/networking/interfaces file. The format of this file is not difficult to put together from the man page, but really, you should search for examples first.
interfaces
Plug in your Ethernet port.

Basically, we’re just adding DHCP entries for our interfaces. Above you’ll see a route to another network that appears when I get a DHCP lease on my Ethernet port. Next, add this:


auto lo
iface lo inet loopback
auto eth0
iface eth0 inet dhcp
auto wlan0
iface wlan0 inet dhcp


To be honest, that’s probably all you will ever need. Next, enable and start the networking service:

sudo update-rc.d networking enable


sudo /etc/init.d/networking start

Let’s make sure this works, by resetting the port with these commands:

sudo ifdown eth0


sudo ip a flush eth0


sudo ifup eth0

This downs the interface, flushes the address assignment to it, and then brings it up. Test it out by pinging your gateway IP: ping 192.168.0.1. If you don’t get a response, your interface is not connected or your made a typo.

Let’s “do some WiFi” next! We want to make an /etc/wpa_supplicant.conf file. Consider mine:

network={
ssid="CenturyLink7851"
scan_ssid=1
key_mgmt=WPA-PSK
psk="4f-------------ac"
}

Now we can reset the WiFi interface and put this to work:

sudo ifdown wlan0


sudo ip a flush wlan0


sudo ifup wlan0


sudo wpa_supplicant -Dnl80211 -c /root/wpa_supplicant.conf -iwlan0 -B


sudo dhclient wlan0

That should do it. Use a ping to find out, and do it explicitly from wlan0, so it gets it’s address first:


$ ip a show wlan0 | grep "inet"

192.168.0.45

$ ping -I 192.168.0.45 192.168.0.1

Presumably dhclient updated your /etc/resolv.conf, so you can also do a:

ping -I 192.168.0.45 www.yahoo.com

Well guess what - you’re now running without NetworkManager!