The release of Ubuntu 16.04 LTS is right around the corner and lots of users will be reloading their systems to take advantage of all the new features and updated software. Also, many other distributions are based on Ubuntu’s LTS versions, so all of you Linux Mint, elementary OS, Linux Lite and Zorin users can look forward to new versions coming along in the coming months, all based on Ubuntu 16.04. This means that lots of folks are going to be reloading their machines to get a nice clean install, so I’m going to present to you some tips and tricks that will make your system faster and more flexible. I’ve installed hundreds of Ubuntu systems over the last few years on all kinds of hardware and I have come up with a combination of tweaks that really make a huge difference in performance. You can mix and match to suit your own system but they really make the most difference when you start from scratch and put them all together at the time of installation.
The biggest data bottleneck in any computer happens whenever the system moves data into or out of hard drive storage so the focus here is on optimizing drive partitioning and activating system features that help keep data transfer rates high and make the most efficient use of available drive space.
Let’s assume that we’re going to install Ubuntu on a computer with one big happy hard drive and that drive is larger than 250 GB’s. We’re also going to assume that the machine does not have UEFI or Secure boot activated or it’s an older model that doesn’t have that feature. I see no benefit in UEFI with Linux so I always turn it off on client’s machines. Explaining how to disable UEFI is beyond the scope of this article because the procedure varies for different makes of computer motherboards but if you have to deal with it, there’s lots of great info on the Interwebs about how to get rid of it.
Hard drives come in three basic types these days: There’s standard spinning drives (HDD), solid state drives (SSD) and hybrid drives (SSHD). We will need to accommodate the differing needs of HDD’s and SSD’s. SSD’s require a bit more attention. SSHD’s are a combination of solid state and spinning drive technology but you can treat them just like standard HDD’s. The logic built into SSHD’s takes care of managing the solid-state portion of the drive. Enough with the preliminaries- let’s go!
Partitioning The Drive
The Ubuntu Ubiquity Installer will gladly partition our drive automatically if we choose “Erase disk and install Ubuntu.” The automatic installer creates one great big partition at the beginning of the drive space that contains the entire system, including all system files, boot files, and user data. It also creates a logical partition at the very end of the drive and assigns it as swap. It chooses the size of the swap area by figuring out the total amount of RAM in the system and giving it just a tiny bit more space than the amount of RAM in Megabytes.
This is all fine and good if we just want a quick and dirty install but what we’ll end up with will be less than optimal for performance and it won’t allow us to do some nifty things, like clone the drive and move the data to a bigger one or re-install Ubuntu or change to another distribution without having to reload our /home directories down the road. I often take this option when spinning up a VirtualBox VM or working with a client who is not all that computer savvy. We’re going for speed here so we’ll choose “Something else” from the list of options.
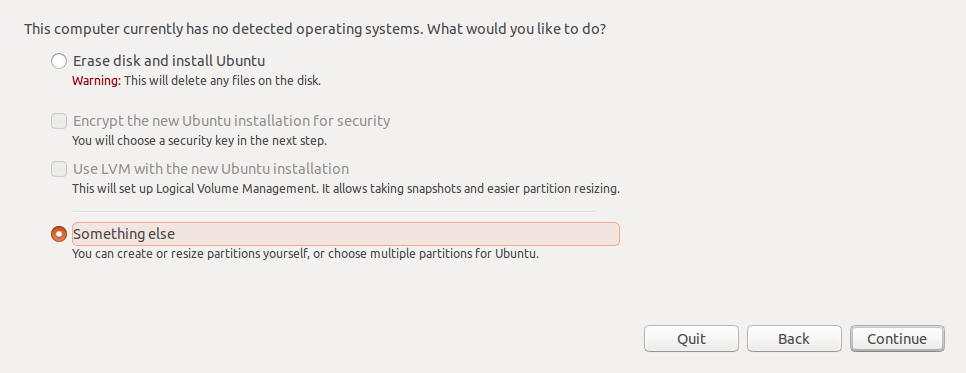
- If the drive already has data on it, we’ll see partitions when the editor loads up. We want to start from scratch, so click on “New Partition Table”. This will remove the old partitions and give us a clean drive to work with. If this is a new drive, you may get a prompt asking you what kind of partition table you want to use. We’ll choose MS-DOS MBR. Either way, we’ll end up with one entry that says “/dev/sda” and under it you’ll see “free space” listed. Click on “free space” and a tool will pop up so we can add the first partition.
- The first partition we create will depend on what kind of drive we’re using. If it’s an HDD or SSHD, adding this extra little partition will help the system boot faster. If we’re using an SSD, we can skip this step completely.
- If we’re working with a standard HDD or SSHD then we will allocate 512 MB’s of space, making sure it’s a primary partition, choose ext2 from the drop down file system menu and make the mount point /boot. You can choose the mount point from the drop down menu there as well. Once the partition is created, you’ll see it pop up as “/dev/sda1.”
- This first partition will hold the running linux kernel and boot loader files. Setting them aside in their own partition will ensure that the boot process will be fast because the files needed are always right up front. Choosing the simpler ext2 filesystem for this partition means faster read/write times since there is no journaling going on like we get from ext4. This is a very small partition and will only hold a few files so it’s best to keep it simple. These advantages are only found with spinning HDD’s or SSHD’s since SSD’s have no rotating platters or heads that jump around to read data from them. It makes no difference at all where in flash memory something is stored; access times are always the same.
- Now, click on “free space” again, and this time we’re going to create the partition where the Linux system files and all of our installed programs will live. How much space we allocate here will depend on what we want to do with this computer: 15 GB is plenty if this machine is going to get light use; we’re not going to be installing a lot of software or we plan to only have it up and running for a little while. If we’re going to make this a multi-user system with lots of different software, edit video or play tons of games, we might choose to make the / partition as big as 30 GB’s. For this example, we’re going to assume this machine we’ll be an average family laptop so let’s choose 25 GB’s of space by typing it in as 25000 Make sure the partition is primary. We want the ext4 file system and the mount point will be /.
- Next, we need to set aside some drive space for the system to use as virtual memory. The swap area is used for a number of different things. The system can stick pages of memory here to free up physical RAM for more active ones. The hibernate function uses this area to store an image of everything in RAM when the computer is put in that mode and some programs use it independently for their own purposes. Swap can also be used when there is a serious system crash as a memory dump space. This means that it would be possible to retrieve info from a system that won’t boot and figure out what went wrong. Unfortunately, there are only about 50 people on the planet who actually know how to do it, so the average user isn’t going to get much out of that functionality but it’s interesting to know about, nonetheless.
How much space we set aside depends on how much physical RAM is in the system. There are widely varying opinions about this and I don’t intend to get into it too deeply here but I will say that my experience tells me that Linux systems run better when there’s plenty of swap space available.
My rule of thumb is to assign 4 GB’s of space for systems with 4 GB’s of RAM or less and a little bit more than the size of the RAM for systems with over 4 GB’s of RAM. Let’s assume we’ve got 6 GB’s of RAM in our laptop and so we’d choose to make the swap area just a bit larger by typing in 6100 in the partition editor. Once again, we’re going to make this partition primary and choose “swap area” from the file system drop-down. There’s no need to set a mount point here. We’ll talk more about swap later on…
Finally, we come to the last partition in our system and it’s going to be where our /home directory lives. It will contain all the settings and personal files for every user on the computer, so let’s give it all of the remaining space on the drive. I usually make this a primary partition for the sake of simplicity. We could opt to make it a logical partition if we think we’ll want to resize it later and add another partition to the system. The MBR partitioning system will only allow for four primary partitions in total so if we created everything we’ve talked about to this point then make the /home partition primary it means the partition table is effectively locked. Let’s select ext4 for the file system and make sure to mount it at /home.
The partitioning is now complete. The installer will confirm it by presenting us with a table of all the partitions we created and if it all looks good we can continue with the install as usual.
Before we move on to other tweaks, it’s important to note that we gained a couple of really nice advantages by placing the swap area between / and /home on the disk. First, it will make the system faster should it start using swap on an HDD or SSHD because the flying head won’t have to go far to find it because it’s right in the middle of the most heavily used data on the disk. If it were at the beginning or end of the drive it would mean a big excursion. With an SSD, access time doesn’t matter but the second advantage applies to all drive types and only makes itself apparent if we should ever clone this drive, so we can upgrade to a bigger one down the road. All we’ll have to do to move the entire system from one drive to the next is clone it, copy it back to the new drive and then use GParted or some other partitioning tool to resize the /home partition to take advantage of all the new free space.
Also, we have /home set off on its own. That means we can re-install Ubuntu or switch to another distribution of Linux without having to reload everything. Just reuse the partitions at install and make sure you don’t allow the installer to format the /home folder. When it boots up, your files and settings will all still be there and all you have to do is reinstall any software you added to the system to get right back in business. Cool, huh?
Enable Write-Behind Caching
Once the system is installed and up and running, we can get faster access times by using the Disk utility to enable Write-Behind Caching on the hard drive. Ubuntu doesn’t enable this by default because it is a bit risky for systems with a lot of data coming in and out all the time like file servers. The average desktop system reads and writes data in short, intense bursts, though. Allowing the system to hang on to data to be written to the hard drive in memory and then writing it once everything settles down can speed things up drastically.
Many programs like web browsers and word processors tend to write a lot of files when they load up or while they’re running. Hard drives can read or write but not both at the same time and with write-behind caching off the write operations are given priority over read operations. The entire system stops until whatever data there is to be written is written. Of course, this is the safest way of doing things but it can be a lot slower, especially when the system is booting up, loading programs and writing logs all at the same time. The risk here is that the system will lose power while there is data in memory that has not been written yet and that might cause data loss or corrupt files. In practice, this is really a non-issue for the average desktop user, though. Laptops have batteries and a sudden system power failure is unlikely. Desktops with no UPS are more at risk but I have yet to see anybody’s system get trashed if the power is removed without warning. The write behind data is not stored for very long and the hard drives on desktops are actually idle for a good deal of the time, even when users are running programs.
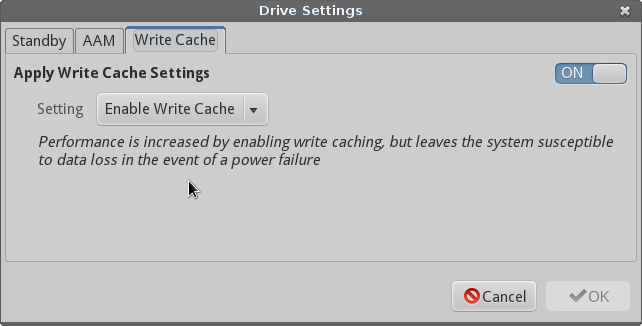
To enable the write cache on your drives, simply open the disk utility highlight your hard drives and then look for the little gear or horizontal lines that designate the “More Actions” menu button in the upper corner. Clicking here will show a pop-up menu and selecting “Drive Settings” takes us to windows where we can set the firmware options on the hard drive. We’ll need to give it pour Administrator password and then we can turn write caching on. If the drive has acoustic management settings, turn them off. This is a feature on some spinning drives that keeps the chattering noise down a bit but it cuts performance too. If you don’t mind the noise, leave it off.
Now, reboot the system and we’ll see a big improvement when it comes to how long the system takes to boot, especially if we’re booting from a standard HDD.
Should we set write behind caching on an SSD? Yes. While SSDs are very fast compared to HDDs, they’re still not as fast as system RAM. If the drive offers write caching, use it. You might just be surprised at how much faster things go.
Adjust Swappiness
We went through setting up our swap area earlier and now we can tweak it just a bit more by changing how the system uses it, if it all. Ubuntu comes with the swappiness set to an arbitrary level of 60. There are a lot of factors that go into swappiness but a good way to think of the swappiness scale is in terms of how much physical RAM the system will use before it begins to swap. The scale is 100 to 0 and so if we have it set to 60 then it means that the system will have used 40 percent of the available RAM before it starts to swap. A lower number will mean that the system will stick with physical memory and fill it up more before it starts swapping memory pages to the hard drive. So, if we set that number to 10 or 15 then the system will have to get mighty low on RAM before it swaps and that’s what we want it to do on a desktop system.
- To change swappiness, we must edit a file called sysctl.conf in the /etc directory. This file holds configuration settings for the Linux kernel itself. To edit this file:
sudo nano /etc/sysctl.conf
- Scroll down to the very bottom of the file with the arrow keys and then add this line:
vm.swappiness = 15
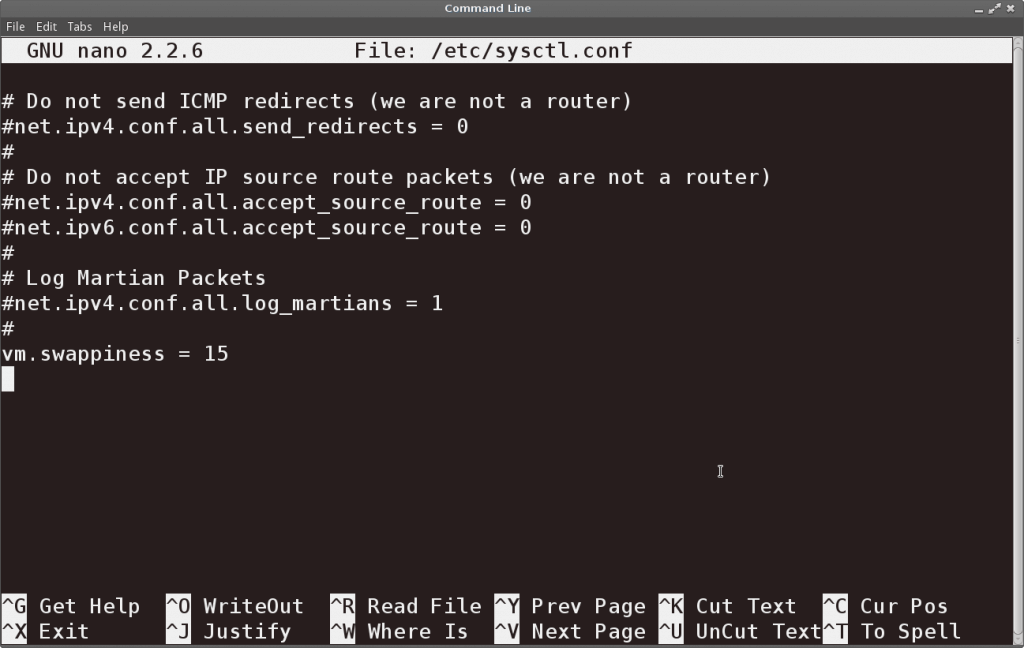
- Save the changes and restart the system to make the new swappiness level take effect. For the truly lazy, here’s a one line command that will do this all in one go:
sudo bash -c "echo 'vm.swappiness = 15' >> /etc/sysctl.conf"
- Keeping swapping to a minimum will mean faster HDDs and it also limits write cycles on SSDs. Limiting your SSD write cycles will help to lengthen the life of your drive.
One last note on swap: If you have a system with oodles of RAM, you might find it disconcerting to devote a lot of drive space to swap when the system probably won’t be using it very often anyway. If you don’t care about hibernating the machine or will never troubleshoot the system’s crash memory dump if it goes completely insane, you can opt to make swap much smaller. You can set as little as 2 GBs but don’t omit it completely. You do need a little swap space.
SSDs and TRIM
SSDs need a little extra care to keep them performing well. Every so often, it’s a good idea to run the ‘fstrim’ command in them. TRIM allows the operating system to tell the internal logic of a solid state drive which flash memory blocks are considered no longer in use by the file system. The drive will wipe them completely. This low-level wiping gives the SSD more places to store new data and extends the life of the drive by limiting write cycles to the same blocks in the system. Deleting a file usually doesn’t delete all the data, just the file’s entry in the table of contents. TRIM deletes everything.
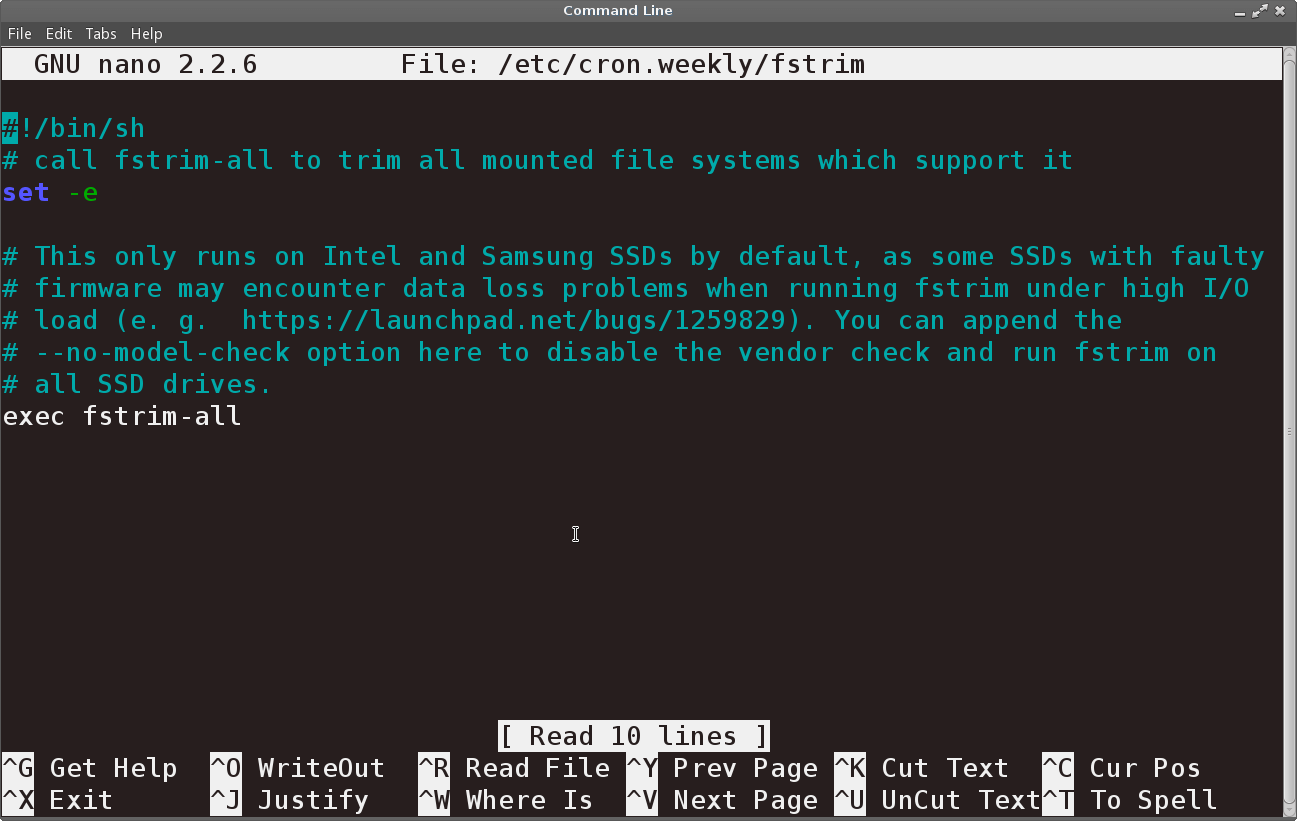
As of Ubuntu 14.04, the fstrim command is placed in the /etc/cron.weekly directory and it executes automatically without any user interaction. You may notice this if you glance at the computer and see that the drive activity light is on solid for about five minutes, even if you’re not doing anything with the computer. When Ubuntu 14.04 was released, the developers chose to limit this function to only a few brands of drives that they had tested to make sure there was no risk of data loss. At the time, there were reports of problems with some SSD’s if there was a lot of I/O activity while TRIM was going on. They decided to limit the automatic fstrim function to Intel and Samsung drives. If you’re using another brand of SSD with Ubuntu 14.04 or a distro based on it, then you may not be getting the TRIM function done automatically. Ubuntu 16.04 has dropped the brand restrictions so this is just for earlier versions of Ubuntu. 16.04 will work with any drive right out of the box.
- Open a terminal and issue this command to edit the fstrim script for cron:
sudo nano /etc/cron.weekly/fstrim
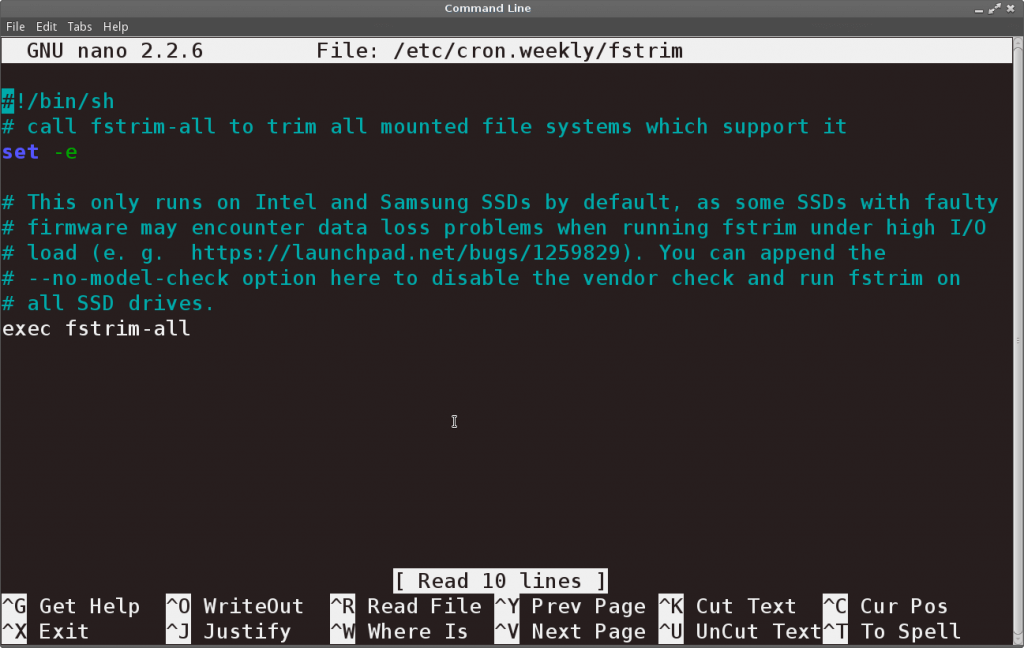
- To make sure your SSD will be trimmed, add the no model check option to the command at the bottom of the file. It should look lit this:
exec fstrim-all –no-model-check
- Save your changes and exit Nano. The next time cron runs its weekly jobs, your SSD’s will get a nice cleaning. You could also just run this command manually every once in awhile but why not let the system take care of it for you?
So now you have a bunch of cool tweaks and tips to make your next Ubuntu install fast and efficient. You can also take advantage of write behind caching on your drives and adjust your swappiness to get more out of your current install. You just might be amazed at how all of these little things work together to make any system perform better.
You’re welcome.
Have fun!

I think there might be some errors in the fstrim command that you’ve recommended ……
The command that you’ve recommended using “fstrim-all –no-model-check”.
First error - there should be a space and then two dashes before the “all” parameter. e.g. fstrim -all.
Secondly, on Ubuntu 15.10, there is no “no-model-check” option for the fstrim command. Below is the output of fstrim -help:
Usage:
fstrim [options]
Discard unused blocks on a mounted filesystem.
Options:
-a, -all trim all mounted filesystems that are supported
-o, -offset the offset in bytes to start discarding from
-l, -length the number of bytes to discard
-m, -minimum the minimum extent length to discard
-v, -verbose print number of discarded bytes
-h, -help display this help and exit
-V, -version output version information and exit
For more details see fstrim.
Signed:
Roy Gilby
This does only apply to Ubuntu 14.04 LTS as the model check was dropped in later versions. I did this point this out in the article. Also, the syntax for that command is copied from the fstrim script in the /etc/cron.weekly directory. I just double checked it and, yes, the correct syntax for that command is “exec fstrim-all -no-model-check” I found that fstrim-all is actually a variation on the fstrim command by executing “which fstrim-all” and the output was “/sbin/fstrim-all.” So, this would explain the differences in syntax. Fortunately, this is a non-issue in everything but 14.04 so those who are installing Ubuntu 16.04 won’t have to think twice about it. 🙂
there is no fstrim-all on my 16.04.
and the `fstrim` cron script calls” `/sbin/fstrim -all`
Right, since this article was published before it was released, that makes sense. It applies to the LTS mentioned previously.
What Matt said… 🙂
Great article!
Would you explain briefly why there is no benefit in UEFI with Linux?
Very nice!
Currently, I have a dual-boot Ubuntu/Qubes laptop, as shown in this image:
https://picasaweb.google.com/lh/photo/xiVCONgVdrAYV4fRIISgDJCVaElcUVxxK016HXQUa9s?feat=directlink
Should I add /home to the top of the last extended partition, which is where Qubes currently sits?
Why not use the new, limitless, partitioning system of GPT instead of the older, limited to 4 primary, partitioning system of MS-DOS? Is it because GPT is related to secure-boot and UEFI?